A while back I drew up a thing I called a workflow timeline (pictured right) – basically an outline of the steps I follow when putting a website together for a client. I wanted to make it simple and colourful – something that I could share with the client, that we could both scribble dates on, so we were all on the same page throughout our time working together. In the end it turned out like a flowchart had a baby with a game of Tetris. It looks a mess.
So here I’m going to outline my process more fully, in more words, and then redesign the thing to be simpler, clearer, and easier to understand. My primary reason for doing this is to benefit clients. My secondary reason for doing this is because I want to alter the way I charge for my services. You’ll note that currently I charge in a rather old-fashioned half-upfront, half-once-done manner. This is great for most cases because it’s straightforward, and clients can feel confident knowing that they don’t need to pay fully until they can see the work has been done. It’s not so good for me, for one reason in particular.
This way of doing things means I feel a bit stuck in the pre-contract phase. Stuck between wanting to put together a design concept without the client entering into a full contract (it seems sensible to be fully sure a client is happy with what I can do for them before they commit) and needing to get some kind of remuneration for the time I spend on that concept – regardless of whether they go ahead with me or not. At the moment I don’t charge a penny for that stage. Again, that’s great for potential clients because there’s zero risk; but it also means I’m working for free up to that point, which is very risky for me. So I need to rebalance this, and whilst I’m there I might as well rebalance the whole thing.
There’s more to this. I think it’s mostly true that when you get something for free you tend to value it less. The direct result this appears to have on my business is that too often I’ll meet a potential new client, really hit it off with them, send them through a concept… and never hear from them again. I’m hoping that by setting up a proper concept stage, with a small fee attached, new clients might be more inclined to follow up. If they don’t, no sweat – they’ve only spent out a little, I’ve been paid for my time: no hard feelings.
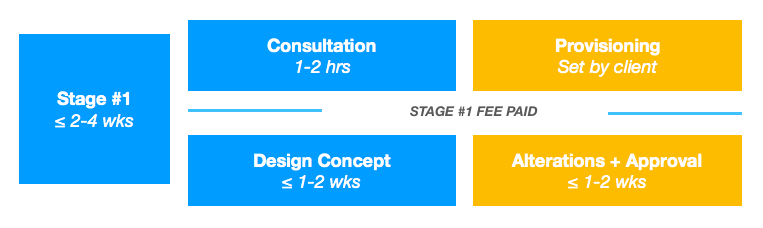
Stage #1: Consultation and concept design
Let’s start at the beginning. I set up a consultation meeting with the prospective client, usually at their home or place of business, at which we discuss what I do and what they’re looking for. The ideal outcome is that the client feels I could be a good fit for their project, and I feel confident I can fulfil the client’s stated needs. The consultation is free, and I intend to leave it that way for now. It’s an hour to two hours, and that has a value, but it’s also just a conversation: an important step toward building trust, but not a product in itself that I’m trying to sell.
From there I go away and put together a design concept based on what we’ve discussed. Sometimes this involves the client sending me through some material (logos for example) – this is marked as provisioning on my original workflow. All my design concepts are built on real code, in the sense that whilst I might send them through as screenshots, there’s no “Photoshopping” involved – I can load them up in a real web browser and navigate them just like any other website, albeit with limited functionality at this stage.
This has advantages over drawing up website design concepts in other ways: through graphic design software, for example. It also has drawbacks. I’m not going to go into either here, other than to say it’s the way I do things and I feel it works for me. What isn’t working for me (or, I suspect, my clients’ drive to get their websites up and running) is giving it away for free – and we’ll come to that in a moment.
The final part of this stage is to send over the screenshots, or sometimes visit the client again in person with the concept, and gain approval, which can also include processing alterations if requested. It’s worth noting that there’s a limit to the kinds of alterations that make sense at this point. Resizing the title, moving the navigation menu, or trying a different colour scheme all seem pretty reasonable requests. Whereas asking for multiple pages to be fully fleshed out with content before they’ll even consider going forward is a bit of a red flag. I’m confident my designs can stand up to the wide variety of content that can be thrown at them, and part of the development process is making certain of this. If a client wants that service, they should be prepared to pay for it.
Speaking of the money side of things, let’s move on to how I’m going to price this stage going forward. Perhaps it’s worth clarifying that I’m not looking to increase the overall cost of a website for the client – I just want to balance the cost across the whole project in a more even manner.
If you take a look again at the Tetris soup that is my first attempt at the workflow you’ll see I’ve written in estimates for my response times at every step of the process. I’m going to use this as a basis for working out the cost I should put against the concept stage. (Quick note: my response times are not the same as the actual hours I will spend on any given stage – they allow for other work I have ongoing, and a work/life balance.) So I’ve got 1-2 weeks written down here, against the total time of 6-14 weeks. As a percentage this works out at between 14-17%. At the lower end of my fee range this then comes to between £45 and £55. So let’s call it £45, because that sounds pretty fair to me, and I can always adjust that upwards on more complex projects if needs be.
This seems like a good place to pause for now. Below I’ve included a new design for this stage of my workflow. I think it’s a significant improvement – see how you feel. We’ll pick up again next time at stage two: development and build.